이직한 회사에 AI용 gpu서버를 세팅했다.
물론 포트포워딩이나 기본적인건 내가 한건 아니지만, 필요한 세팅은 알아서 해야했으므로
파이썬 설치 및 nvidia 드라이버를 설치해보자.
파이썬 설치 및 alias 설정이니 필요한 경우에 읽어보자.
다음 명령어로 파이썬 버전을 확인해보자.
python --version
python3 --version
리눅스엔 기본적으로 파이썬이 설치되어있다. 2.x 버전, 3.x 버전.
위의 명령어로 바로 3.x가 나온다면 이 글을 접고 다음으로 넘어가자.
아래의 명령어로 버전이 출력된다면
ln -s /usr/bin/python3 /usr/bin/python이렇게 해주면 python alias 등록이 완료된다.
Permission 에러는 sudo 명령어로 해결 가능하다.
apt의 버전을 업데이트 해주자.
sudo apt update && sudo apt upgrade -y
업데이트가 완료되면
아래와 같은 명령어로 설치되어있는 gpu를 확인할 수 있다.
ubuntu-drivers devices물론 나는 ubuntu-drivers가 설치가 안되어있어서인지
아래와 같이 따로 설치해야했다.
sudo apt install -y ubuntu-drivers-common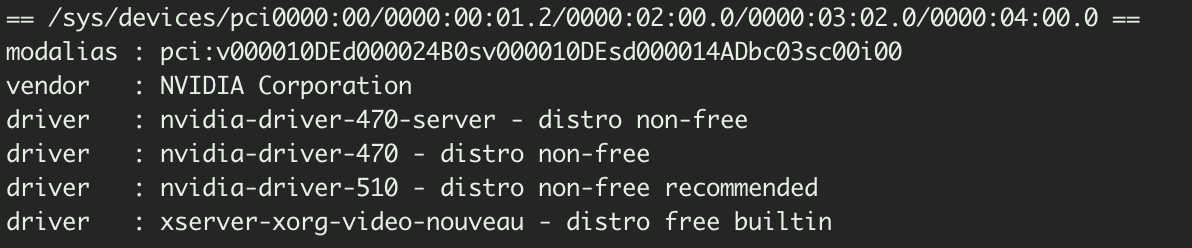
이렇게 제대로 인식하면,
아래의 자동 설치 명령어로 설치한 다음 재시작 하면 드라이버 설치가 완료된다.
자동설치로 욕봤다. Ai학습이 목적이라면, cuda 버전을 잘 확인해서 설치해야한다.
나는 cuda 11.2버전, torch 1.7.1을 설치했으므로 아래와 같은 명령어를 통해 설치를 진행했다.
sudo apt-get install --no-install-recommends nvidia-driver-460
pip install torch==1.7.1+cu110 torchvision==0.8.2+cu110 -f https://download.pytorch.org/whl/torch_stable.html

sudo reboot
https://pytorch.org/get-started/previous-versions/
PyTorch
An open source machine learning framework that accelerates the path from research prototyping to production deployment.
pytorch.org
위의 공식 홈페이지에서 cuda , torch 버전에 맞는 명령어를 통해 설치하면 된다.
나는 아래의 에러메세지가 출력되었다.
ERROR:root:could not open aplay -l
    Traceback (most recent call last):
    File "/usr/share/ubuntu-drivers-common/detect/sl-modem.py", line 35, in detect
        aplay = subprocess.Popen(
    File "/usr/lib/python3.8/subprocess.py", line 858, in __init__
        self._execute_child(args, executable, preexec_fn, close_fds,
    File "/usr/lib/python3.8/subprocess.py", line 1704, in _execute_child
        raise child_exception_type(errno_num, err_msg, err_filename)
    FileNotFoundError: [Errno 2] No such file or directory: 'aplay'
해결 방법은
sudo apt install alsa-base오디오 관련 이슈라고 한다.
아래의 명령어로 실시간으로 그래픽카드 사용량을 확인할 수 있다.
watch -n 0.5 nvidia-smi
'linux' 카테고리의 다른 글
| [방화벽 설정] 외부에서 접속 허용하기 (0) | 2022.11.24 |
|---|---|
| [Ubuntu] Flask / Django 등을 서비스로 등록하자 (0) | 2022.07.28 |
| [Ubuntu 20.04 LTS] apt-get 삭제 후 재설치 (0) | 2022.03.22 |
| 406 Not Acceptable (0) | 2022.01.19 |
| crontab 설정하기 (0) | 2021.07.19 |